The eagle flies on Friday
Minnie is becoming a little more maximal:
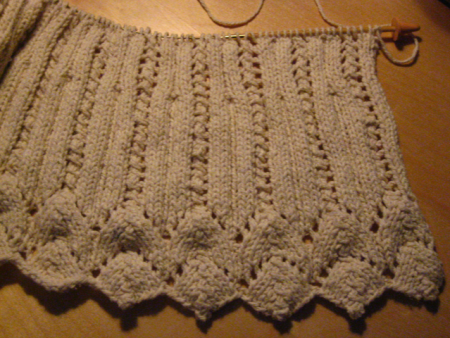
It won’t be long before I’ll have beads. And then! Look out!
Moving on, a number of people have asked if I will write up the pattern for “Time Out of Mind.”
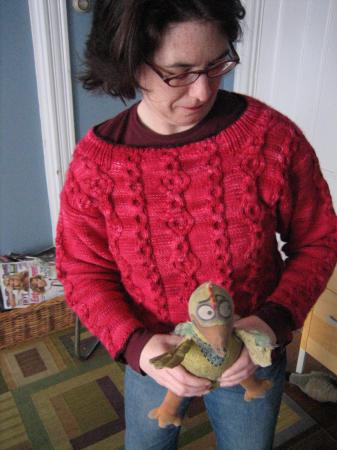
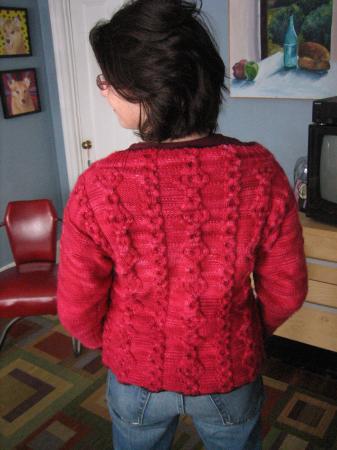
I have decided, in the interests of time and out of respect for Fiona Ellis—who originally combined these cables in one of her designs, doncha know?—to go about half-way on that request and give you something that is less like a pattern and more like a recipe. Be forewarned that this will require some rejiggering on your part; I’ll suggest ways to alter the pattern to make it a different size.
The existing “Time Out of Mind” was knitted to fit a 36″ bust, so the instructions will start from that foundation. To alter it, you can add or subtract stitches in between the cables or along the sides. Or you could simply add more cables. Keep in mind that it will look best if you have an odd number of cables, such that the middle cable is one of the larger, double-circle cables.
My sweater had seven cables on the back and seven on the front. It is a simple drop-shoulder shape, so the construction is very basic. I knit the body and the sleeves in the round and did a three-needle bind-off at the shoulder, so “Time” is my amazing seamless sweater. And I really, really liked it that way.
The charts come from Fiona Ellis’s Inspired Cable Knits and are part of a pattern she calls “Ripples in Time.” Out of respect for her design work and for copyright law, I will not reproduce those here. The book is lovely. You won’t regret owning it.
I started out by falling in love with the cable combination she used, then I bought a boatload of worsted weight Malabrigo in color Scarlet, one skein in color Velvet Grapes, and Ann Budd’s The Knitter’s Handy Book of Sweater Patterns, another book you won’t regret owning.
If you want to do this from scratch, just get a yarn you like, swatch it over the pattern, get the gauge, find the sweater style you like from Ann Budd’s book, and then follow her instructions for how many stitches to cast on, etc. That’s really what I did, although it took a little extra math because my gauge on a 32″ U.S. size 7 Addi Natura circular needle was 5.7 stitches to the inch, not a neat 5 or 6.
Here’s what I did, more or less:
Cast on 228 stitches in CC (Velvet Grapes) on a U.S. size 7 32″ circular needle. Join, being careful not to twist. Place markers at the beginning of the row and after the 114th stitch to mark the front and back of the sweater.
Change to MC (Scarlet) and knit 2 rows in seed stitch.
P 1 at the beginning and end of every pattern row on both the back and the front (leaving 112 stitches over which to distribute the cables; each of the 7 cable panels is 16 stitches).
Following the charts, knit cable panels until work measures 13.5 inches. Divide the front and back for the armholes. Knit the back straight until armhole measures 9 inches. On right side, knit 19 stitches in cable pattern and place these stitches on waste yarn. Bind off 14 stitches. Knit the middle 48 stitches in cable pattern and place these on waste yarn. Bind off 14 stitches. Knit the final 19 stitches in pattern and place them on waste yarn.

Now knit the front straight in pattern until it measures 7 inches. Now I must admit that what I did for the neck shaping is somewhat sketchy, but it was more or less this: knit 33 stitches in patttern on right side of work; place the remaining stiches on waste yarn.
At neck edge, bind off 2 stitches on even rows 4 through 12, bind off 1 stitch on even rows 14 through 20. Knit even with back. Place remaining stitches (19) on waste yarn.
Knit and then place middle 48 stitches on waste yarn for front neck. Work left neck shaping to mirror right.
Using a three-needle bind off, “seam” the shoulders.
Starting at the center of the underarm, pick up 96 stitches evenly around the armhole for each sleeve on a 16″ U.S. size 7 circular needle. Place markers for center 16 stitches; these are for the one large center cable that runs down each sleeve. The other stitches are purled (reverse stockinette). Place another marker to mark the beginning of your row; this marker should be in the center of the underarm.
Working cable according to chart and the rest of the sleeve in reverse stockinette, decrease 2 stitches on either side of the marker every 6 rows, 6 times (to row 36), then decrease 2 stitches every 4 rows starting with row 40 and ending with row 112. (Change to two circulars or to double pointed needles when you have decresed to a point that this becomes necessary.) Continue in cable pattern and reverse stockinette through row 118. Knit two rows in seed stitch and bind off in CC.
Now back to the neck. Pick up 22 stitches along the bound off edge on the right side, pick up and knit the 48 front neck stitches from the waste yarn keeping the cable patttern continuous, pick up 22 stitches on the bound off edge on the left side, pick up and knit the 48 stitches at the back neck keeping the cable pattern continuous.
I worked the neck on a 24″ U.S. size 7 circ. needle. The picked up stitches were worked in a K1, P1 ribbing. Work 11 rows, continuing the cable panels and continuing the ribbing on the sides. On rows 7, 9, and 11, decrease 4 stitches total by purling 2 tog in the reverse stockinette between the cables (2 decreases in front; 2 decreases in back). At the end of row 11, you will have decreased 12 stitches total from the neck. I found that it worked best to decrease right at the edge of the cable, where it was less obvious. I also varied where I did the decreases, again so it was less obvious.
Knit 1 row in seed stitch. Bind off in CC.
Pop sweater on over your head and live your life! No seams, no blocking, no nothing! You are ready to go!
As I said, this is more a recipe than it is an exact set of instructions, but I think it can be easily varied to create a range of sizes, especially since the sweater is relatively loose-fitting and the cables tend to make it hug your body.
Good luck! May Time look good on you.
March 3rd, 2007 at 7:44 am
I can’t believe how much you’ve done on Minnie. I guess now that the longer rows are over, things are moving faster.
Nice diplomatic way to get the pattern out there!
March 3rd, 2007 at 8:20 am
Cool cool! Thank you so much 🙂
March 5th, 2007 at 12:55 am
Nice job on Time! And that color is great on you.
Hope Shelly and Alex are doing better.
Lord love a duck! Or is he a chicken? Where did that one come from? I just love his eyes!
March 5th, 2007 at 1:35 pm
Thanks for sharing the “pattern” with us. I can’t wait to see Minnie as an FO!
=:8
March 7th, 2007 at 5:19 pm
Thanks for your generous sharing of the Time recipe.
And what’s up with the fowl? Reminds me of MacBeth, you know, “fair is fowl and fowl is fair. Hover through fog and filthy air.” Was he talking about Boston?
July 18th, 2007 at 11:00 pm
Minnie is looking very nice!